Canadian Train Bridges and Trestles
Alberta
View my Alberta section of this page for the
most up to date pictures of The CPR’s Bonnybrook Bridge
collapse, southeast of downtown Calgary Alberta.
There are some extremely detailed Close up of the damage.
This pictures were provided by Massey F. Jones
| I decided to write this page on railway bridges after a visitor Arthur Grieve, Winnipeg, Manitoba offered to give me a number of railway bridge pictures that he had collected. I again hope that my visitors will be sending me their pictures to be included on this page. johnmacdonald@summerville-novascotia.com |
Alberta
Join me on facebook so that you can keep up with all the changes to
this page and all the rest that make up Old Canadian Railways
Old Canadian Railways
Promote Your Page Too
| The Lethbridge Viaduct |
.jpg) | Encased in a Plexiglas case at the Galt Museum in Lethbridge, Alberta is a replica of the travelling crane, used to build the CPR High Level Bridge, also called the Lethbridge Viaduct, created in 1994 by Engineer Robert J.D Gardner, to a scale of 1:87 (HO Gauge) and donated to the Sir Alexander Galt Museum as an artifact. The orange beam in the background is part of 3 pillars depicting the viaduct on a larger scale and it dominates dominates that portion of the exhibition floor. Some of the explanations in the following captions are copied from the two panels to the left and others researched. The viaduct features 33 towers in total, employed 100 workers and cost $1.33 million; which today would amount to billions. Close-ups of this fine model are seen in adjacent pictures, all taken on April 11th, 2014. |
| This picture was taken and submitted by Massey F. Jones | |
 | Inching forward, the travelling crane lifted and moved steel rails and girders either from the valley floor or from a flat car under its belly, after it encountered the river. There was in total 18 kilometers of cable to do the lifting. In this view, the front portion has yet to be fitted with rails before the erector moved forward.. The chief engineer was John Edward Schweitzer (April 1870 � January 1911), who worked for the CPR, while the bridge was built by the Canadian Bridge Company of Walkerville, Ontario. Another project for which Mr. Schweitzer is widely known for, is the construction of the famous CPR Spirals Tunnels west of Lake Louise, covered extensively at http://yourrailwaypictures.com/Tunnels/ |
| This picture was taken and submitted by Massey F. Jones | |
.jpg) | A closer look at the exhibit reveals a riveter or a painter on the platform and more platforms below. Missing on this model; is a smaller traveller which followed the crane as it moved forward and whose sole purpose it was to feed compressed air to the riveting crew below. It is visible in a period picture, somewhere else on this page. Over 12,000 tonnes of steel and 13,000 cubic metres of concrete became necessary to assemble the steel bridge, also called a viaduct, in 1909. At 1.6 km long and 100 metres high, it is the longest structure of its kind in the world. |
| This picture was taken and submitted by Massey F. Jones | |
.jpg) | In this view, a girder section at the front, is about to be join the rest of the bridge. The steam boiler and other controls were all housed the travelling crane, which was constructed on-site. The structure likely also contained the engineering office at the front, where blueprints were consulted and calculations made and the rear contained the machinery. The two hoses on back lead to a smaller unit, which, along with the larger unit moved forward, feeding compressed air to the riveting crew on platforms below. The exhaust stack for the steam-powered crane can be seen about the upper middle of the picture. View the period picture on the page, for the set-up |
| This picture was taken and submitted by Massey F. Jones | |
 | Notice the fine detail that went into this model. A plaque in front of the model indicates that the scale is 1:87 (HO Scale), where 1 scale ft. on the model represents 87 ft. in real time. These are probably the painters. The bridge was painted black. |
| This picture was taken and submitted by Massey F. Jones | |
 | A 1909 photo of the travelling crane and smaller riveter; which followed the crane as it moves along the bridge, providing compressed air. The viaduct has a slight ascent westward of 0.4% and has no tangents (curves). Additional precautions were taken because of severe winds usually experienced in the area, it was decided to build the sides in such a way that a train wouldn’t be running off the bridge deck. The bridge is erected on concrete pedestals. |
| Source: Sir Alexander Galt Museum and Archives P19738126000 on wall near the model display – MF Jones copy. | |
 | Looking towards city center from almost the very end of the viaduct in West Lethbridge, we get a good idea of some of the construction of one of the towers, which after the road, drop sharply into the Oldman river, before rising on the other side. The road under the bridge is Crowsnest Trail, which a few metres to the left down the road, will hook up to Alberta Highway #3 and eventually lead into the southern part of BC. |
| This picture was taken and submitted by Massey F. Jones | |
 | By the looks of this sign, a lot of trespassers have been on the tracks. This view looks slightly below the track at West Lethbridge, almost to the end of the viaduct. The largest rail bridge in Canada is an adventure magnet for BASE jumpers who like to hike to the the middle of the 1.6 km ( 5,327 ft.) and then parachute off the bridge . In 2013, there was a $287 fine by CPR police for doing so. Whereas old style trestles had small platforms to hold water barrels and seek refuge and a pedestrian on the bridge could seek refuge there while a train happens, the Lethbridge viaduct does not have this extra safety feature. From rail to river is a drop of 314 ft. |
| This picture was taken and submitted by Massey F. Jones | |
 | CP Freight High Level Bridge Lethbridge AB in August 1992, viewed from Indian Battle Park The park name commemorates the last battle between the Cree and the Blackfoot, fought here in 1870. Much of the battle took place in Indian Battle Coulee on the west side of the river (to the left), while the retreat across the river ended in a last stand close to the Coal Banks Interpretive Centre (near this picture site). A formal peace treaty between the two nations was signed the following year. |
| This picture was taken and submitted by Massey F. Jones | |
 | Almost the entire viaduct, viewed from one of the parking lots behind The University of Lethbridge, on a very blustery cold April 11th, 2014. In the middle, the road is Whoop-Up Drive. The view overlooks Boterhill Bottom Park (near) and Indian Battle Park (center), the latter featured on this page |
| This picture was taken and submitted by Massey F. Jones | |
.jpg) | A composite of 2 photos this view shows the entire bridge almost from end-to-end, looking west from the end of 1 Ave South. The road eventually joins Crowsnest Trail and leads into Southern BC. To the left is a large parking lot. The bridge is 1.6 km log and a bit over 100 m high, with 33 towers. |
| Massey F. Jones collection |
| The Lethbridge high level bridge with a train that had two engines in the front then cars the full length of the bridge, a robot and another set of cars the full length of the bridge, another robot, another set of cars the full length of the bridge again and a robot at the tail end pushing. Based on the length of the bridge which is believed to be very close to a mile, this train was somewhere around 15,000 feet long or 3 miles! |
 |
| Lethbridge high level bridge |
| This picture was taken by Peter J Wilson |
 |
| Lethbridge high level bridge |
| This picture was taken by Peter J Wilson |
 |
| Lethbridge high level bridge |
| This picture was taken by Peter J Wilson |
 |
| Lethbridge high level bridge |
| This picture was taken by Peter J Wilson |
 |
| CPR Monarch Bridge |
| This picture was submitted by Dale Redekopp St. Albert, AB |
 |
| CPR Monarch Bridge |
| This picture was taken and submitted by Massey F. Jones |
| Looking similar and constructed about the same time and by the same company as the High Level Bridge in Lethbridge AB (named for William Lethbridge, 1825-1901), the CPR Monarch Bridge is often overlooked by railfans visiting the area. Yet, it is only located 23 km (14 mi) northwest of its big brother on Highway 3, about half-way between Lethbridge and Fort Macleod. It has the same structure but not as long or high. It greatly shortened the distance and lessened the grades when it was built in 1908-1909 to replace a series of short bridges. The steel for this bridge was brought by rail in pieces from the Dominion Bridge Company of Walkerville Ontario and assembled with the famous �erector� which had constructed the big one. The Monarch Bridge stands 48m above the Oldman River and measures 576m end to end, while the Lethbridge Viaduct is about a kilometer longer, but still massive and a sight to see. Situated on the CPR Crownest Sub., it sees occasional from the US into Calgary, which has or will pass on its bigger cousin. The GPS location of the bridge is approximately 49º48�6�N 113º12�09.4W. The best vantage point is aroud a curve from Highway 3 (where this photo was taken from a moving bus on April 13th, 2014) but there are roads leading right to it. Another notable rail bridge in the area is located at Carmangay on the CPR Alderside Sub. It looks like this one but is smaller and newer (1927). View it at https://albertacommunityprofiles.com/Profile/Carmangay/255 or better still: http://www.railpictures.net/photo/404342/ |
 |
| Submitted by Massey F. Jones |
| MONARCH, listed on an abbreviated version of Employee Timetable No. 86, May 29, 1983. Newer employee timetables will show KIPP at Mileage 11.0 CP Crowsnest Sub, which is where the Lethbridge CPR yard has now moved. See my Station page http://yourrailwaypictures.com/TrainStations/indexCentral.html for more details. |
 |
| Photo: Late Lorne Unwin � Massey F. Jones collection |
| A 1980s view of the trestle, just north of Carmangay, Alberta, located 62 kilometres (39 mi) north of Lethbridge and 150 kilometres (93 mi) south of Calgary, along the CPR Alderside Sub. Timetable 23, shown on my Western statios page at http://yourrailwaypictures.com/ TrainBridges/indexAlberta.html shows the location of Carmangay well, in relation to Calgary and Lethbridge. The trestle is used infrequently between the two cities for freight service only. The name Carmangay originates from C.W Carman and his wife Gertrude Gay, who operated a wheat farm on what is now the trestle site. It is unknown who built the bridge but Dominion Bridge erected similar structures on the Crowsnest Sub, more to the south, at Monarch and Lethbridge (both shown on this page), about the same time period. Very easy of access, the trestle was built by the CPR in 1911 as a wooden bridge and replaced by the by a steel structure in 1928. View a period photo of the trestle being changed from wood to steel at http://www.galtmuseum.com/permalinkA/5005/ Published data puts it at 150m long (just short of 500 ft.) and 44m high (just short of 150 ft.). In its time, the Carmangay trestle was the longest for its height. Excellent close-ups photos of the trestle from various angles at http://www.bigdoer.com/6720/exploring-history/bridge-hunting-carmangay-alberta/ |
 |
| The Beaver River Trestle near Grand Centre in Northeastern Alberta, likely photographed from an RCAF plane from Cold Lake, because the trestle is on the flight path. The trestle is a combination timber, as well as truss and girder built in 1931 and stands 60 metres high spanning 450 metres across the valley. When CN abandoned rail service in 1999, ten municipalities and a volunteer organization worked together to acquire the 300km. long corridor and it became part of what is now called the Iron Horse section of the Trans Canada Trail, linking Cold Lake Alberta, to Northwestern Saskatchewan with many small towns along the way. It took two years after ownership was secured in 2001, in order to have the corridor in good enough shape for multi-use as a recreation trail. Opened in June of 2003, it has since grown to be the region’s largest tourist attraction with an average of 20,000 users per year http://travelalberta.com/Things%20to%20Do/Scenic%20Routes/Iron%20Horse%20Trail.aspx The trestle was damaged in June 2012 after a lit car was pushed off the north end embankment, became lodged in the trestle and set the structure ablaze, the latest fire to the structure. A fund was then set up to repair the trestle and make it an area attraction again for walkers, bicycle riders and motorized transport, such as ATVs in the summer and snowmobiles in winter. |
| Massey F. Jones collection |
 |
| Beaver River Alberta This trestle bridge crosses the Beaver River going into Cold Lake, Alberta. The train service has been discontinued but this bridge is now part of a cross country trail and is spectacular |
| This picture was submitted by Svala Dunn |
| Canadian Northern Railway Bridge, Calgary Alberta The Canadian Northern Railway steel bridge was built in 1914 to handle the heaviest trains at the time. At one end was the railway station, purchased for offices in 1911 and converted to a station in 1913. The other end was a 23-acre area purchased from the Lindsay Estate in 1911 for a yard (called McKee Yard), which had 10 tracks. Upon arrival, passenger trains entered the station northbound, to the end of the platform. The coaches were then uncoupled and a yard switcher hauled them to the yard, where they were cleaned and turned 180 degrees on a wye. The locomotive then followed under its own steam, proceeding to the roundhouse, where it too was serviced and turned on the turntable. Prior to departure, a switcher pushed the coaches across the bridge to the station and the locomotive backed up to its train. Now facing in the proper south direction, everything was ready to leave. The CNoR station served passengers from 1911 to 1918, when CNoR became absorbed by the Canadian National, which used the tracks until 1971. In the last years of service, the bridge handled two CN “Railiners” (RDC cars), one from Calgary to Drumheller, the other one from Calgary to Edmonton via Three Hills and Mirror in Northeast Central Alberta. McKee Yard was purchased by the City of Calgary in 1970 and developed as Lindsay Park. In 1999, the side platforms were removed from the bridge and the area dotted with a few interpretive displays, including a bit of the old track. The bridge was then reserved solely for pedestrians and bicycles only and it sees fairly constant use. The station stood vacant until a fire gutted most of the interior in 1985 and it was restored in 1987. For more details see my Station page: http://yourrailwaypictures.com/TrainStations/indexCentral.html  Nordegg AB This picture was submitted by Dale Redekopp St. Albert, AB  Nordegg AB This picture was submitted by Dale Redekopp St. Albert, AB Nordegg AB This picture was submitted by Dale Redekopp St. Albert, AB  Nordegg AB This picture was submitted by Dale Redekopp St. Albert, AB Nordegg AB This picture was submitted by Dale Redekopp St. Albert, AB  Nordegg AB This picture was submitted by Dale Redekopp St. Albert, AB Nordegg AB This picture was submitted by Dale Redekopp St. Albert, AB  Rocky Mtn House AB This picture was submitted by Dale Redekopp St. Albert, AB Rocky Mtn House AB This picture was submitted by Dale Redekopp St. Albert, AB  Rocky Mtn House AB This picture was submitted by Dale Redekopp St. Albert, AB Rocky Mtn House AB This picture was submitted by Dale Redekopp St. Albert, AB  Rocky Mtn House AB This picture was submitted by Dale Redekopp St. Albert, AB Rocky Mtn House AB This picture was submitted by Dale Redekopp St. Albert, AB The bridge, as it appeared circa 1914, scanned from a Glenbow Museum Archives (ND-8-306) purchased slide. The church on the left is the old St Mary’s Cathedral, now reconstructed. Submitted by Massey F. Jones  The front end of the Canadian Northern station at The front end of the Canadian Northern station at 141 – 18 Ave. S.W in Calgary from a Glenbow Archives slide. It was used by the Canadian National Railways until 1971. See my Western stations page for more details. Submitted by Massey F. Jones  The Canadian Northern Railway bridge deck, looking straight north. Notice the Calgary downtown core in the distance. The bridge is limited to pedestrians and bicycles. Photo: Massey F. Jones The Canadian Northern Railway bridge deck, looking straight north. Notice the Calgary downtown core in the distance. The bridge is limited to pedestrians and bicycles. Photo: Massey F. Jones  The CNoR Bridge was built to accommodate the heaviest locomotives at the time. Notice that it is now in a pastoral setting, with the Elbow River flowing under the bridge. The CNoR Bridge was built to accommodate the heaviest locomotives at the time. Notice that it is now in a pastoral setting, with the Elbow River flowing under the bridge. This view looks west. Photo: Massey F. Jones  This view looking northeast shows the large piers to This view looking northeast shows the large piers towhere the platform was extended in the train passenger days, to enable them to detrain and proceed to the station to the left. Photo: Massey F. Jones  A close-up from a large 1979 map showing the yard. A close-up from a large 1979 map showing the yard. No tracks exist there anymore. The bridge is at the top left corner. Notice the Calgary Stampede Grounds to the right (Exhibition Grounds). Submitted by Massey F. Jones |
 | Hard to believe that this humble little bridge over the Elbow River, almost in front of Fort Calgary at 9 Avenue and 8 Street SE, is directly responsible for Calgary being the city that it is today. Between 1881 and 1885, as the CPR was pushing west, speculators were buying lots in what is now the Inglewood District, in the hope of selling their land to the railway and make a large profit. After having safely secured the lands across the Elbow River to the west of Fort Calgary, particularly the strip along where the Palliser Hotel now stands, CPR announced that its townsite would be situated there and the speculators went bust, as a good deal of citizens decided to move their gear across the ice the following winter and settle into the new townsite, which became Calgary. The train on the bridge, is most probably what is known locally as “The Keith Turn”; heading back to Alyth classification Yard, from the CPR overflow yard (Keith) on the west side of Stoney Trail in Northwest Calgary. http://www.matthicksphoto.com/railway-photography/ canadian-pacific/3071-keith-1.jpg.php Notice the two different paint schemes on the diesels |
| This picture was taken and submitted by Massey F. Jones | |
 | VIA6428 Crossing the Twin Bridges, Bowness Calgary AB |
| This picture was taken and submitted by Massey F. Jones | |
 | VIA Dayliner crossing the Bow River in Calgary July 20, 1985, bound for Edmonton on the CP Red Deer Sub. Service was discontinued shortly thereafter |
| This picture was taken and submitted by Massey F. Jones | |
 | The CPR Bridge spanning the Bow River in Calgary between Alyth Yard (12th STREET EAST), Mileage 0.0 and BENGAL, Mileage 1.1 on the Red Deer Subdivision. The train is inbound for Alyth and the view looks east along the Bow River from an area behind the Calgary Zoo in the early 2000s. Bengal is roughly situated below the Calgary Herald Building to the east, or the Telus Spark science centre to the west. Access my bridge page for several photos of a round culvert train tunnel there. |
| This picture was taken and submitted by Massey F. Jones | |
_track_to_Ogden_(right).jpg) | View from Ogden Road in Calgary looking north. In the background, the CN bridge leads to Sarcee Yard (right). Not used much anymore. In the foreground, theCP mainline (Brooks Sub). A half-mile to the right is Ogden (Alstrom) shops and a few yards to the left is the south end of Alyth Yard.The locos are going into a siding into Ogden yard. |
| This picture was taken and submitted by Massey F. Jones | |
 | Edmonton High Level Bridge The bridge opened in 1913, linking Edmonton to South Edmonton (Strathcona). CPR ceased operations on the bridge in 1989 Still an imposing structure, (755 m long and 49 m high), it served as a transfer link between the South Edmonton station (see my Stations page) and the CNR downtown, until its yard was bulldozed, to build the Grant McEwan University downtown campus. Rail used the top deck, while cars, transit buses and pedestrians use wooden sidewalks on both sides of the lower deck. Trucks are prohibited on the bridge. On the opposite side from this view is, a “waterfall” higher than Niagara Falls, which operates during holiday weekends. In the foreground is the Edmonton Transit LRT, across the North Saskatchewan Riverto the University of Alberta and beyond. For more details on this bridge see http://en.wikipedia.org/wiki/High_Level_Bridge_(Edmonton) |
| This picture was taken and submitted by Massey F. Jones | |
 | Edmonton High Level Bridge During summer, the Edmonton Radial Railway Society operates a streetcar on the uppper deck. The photo shows a view of downtown Edmonton from the streetcar. In a few minutes, it will arrive at Grandin Station (one stop from downtown), after having left Old Strathcona and gone through a former CPR tunnel. A ride on this private right-of-way is worth every penny. http://www.edmonton-radial-railway.ab.ca/ |
| This picture was taken and submitted by Massey F. Jones | |
 | Edmonton’s High Level Bridge, taken from the 21st floor of a downtown hotel, early October 2011. This is the side, out of which flows The Great Divide Waterfall http://www.edmonton.ca/attractions_recreation No trucks are allowed on the bridge, which is reserved for cars, transit buses and pedestrians. The left centre of the photo(orange portion), shows how cars come off the bridge. |
| This picture was taken and submitted by Massey F. Jones | |
 | From May (Victoria Day) to October (Canadian Thanksgiving) , the Edmonton Radial Railway Society operates one or 2 streetcars (depending upon the season) over the High Level Bridge, using former CPR trackage, on the top deck. Compared to the bridge size, little Osaka #247 tramway is insignificant. View the tramway history at: http://www.edmonton-radial-railway.ab.ca/highlevelbridge |
| This picture was taken and submitted by Massey F. Jones | |
 | Another series of the Edmonton’s High Level Bridge |
| This picture was taken and submitted by Bruce Raynor | |
 | Edmonton’s High Level Bridge |
| This picture was taken and submitted by Bruce Raynor | |
 | Edmonton’s High Level Bridge This an Edmonton Radial Railway’s alternate tramway, (Melbourne # 930 – built 1947) which the Edmonton Radial Railway Society uses during the busy summer season, in addition to their Osaka #2 streetcar shown elsewhere. http://www.edmonton-radial-railway.ab.ca/streetcars All their tramways have been lovingly restored by volunteers in their carbarn, next to Old Strathcona Farmers’ Market. This view looks toward the city from the south shore of the North Saskatchewan River. |
| This picture was taken and submitted by Bruce Raynor | |
 | Edmonton’s High Level Bridge According to ERRS history, the bridge deck had 3 tracks and the CPR used the center tracks. The operation was left hand running, so that if the street cars became disabled, passengers wouldn’t have to step out in space. But there were never any accident and the operation ran accident-free until abandonment in 1951. |
| This picture was taken and submitted by Bruce Raynor | |
 | The CN bridge over Ogden Road in Calgary. The track is a spur off Sarcee Yard (about a kilometre away in the background). The CPR Brooks Sub runs under the bridge and the south end of Alyth classification yard is nearby. For those without transportation, Calgary Transit Route #24 runs for a great portion, alongside Alyth Yard and the Brooks Sub. |
| This picture was taken and submitted by Massey F. Jones | |
 | CN 1286 runs on a spur out of Sarcee Yard (in the background to a local industry in the mid-nineties.) They aren’t used much anymore. |
| This picture was taken and submitted by Massey F. Jones |
 | The CN bridge over Ogden Road and CPR Brooks sub, in southeast Calgary Sep 88. Calgary Transit bus Route 24 follows most of Alyth classification yard and a goodportion of the Brooks Sub. |
| This picture was taken and submitted by Massey F. Jones | |
 | This is a very rare photo of the Alberta Central Railway pillars taken in October 1989. Only one pillar is left today; along Taylor Drive, just north of 22nd Street in Red Deer AB, where it is one of the historic landmarks The west pillar (to the left in the photo) was removed in 1992 for the construction of Taylor Drive on the former CPR right of way (the tracks shown here). The pillars had supported the ACR bridge over the CPR in 1910-11 but (the bridge) was likely never used as the CPR took over the ACR and had no interest in the east section. The date when the actual bridge was removed cannot be determined. More details on the pillar can be found at http://www.forthjunction.com/dawe-acr-pillar.htm The Forth Junction Heritage Society www.forthjunction.com also has a few links on the early area railways, such as the ACR the Canadian Northern Western Railway and the Calgary & Edmonton Railway (C&E) including stations, |
| This picture was taken and submitted by Massey F. Jones | |
 | Historic railway site sign at the site of the Alberta Central Railway bridge |
| This picture was submitted by Massey F. Jones and was taken by his wife on April 17th, 2010 | |
 | |
 | |
 | The pillar as it appears today. In the background is Taylor Drive, constructed where the tracks once stood. |
 | The opposite side of the pillar shown above |
| This picture was submitted by Massey F. Jones | |
 | The twin bridges in the the Bowness area of northwest Calgary, photographed from Bowmont Park, adjacent to the Silver Springs community (easily reached by Transit and driving). The view looks roughly southwest. The photo was taken on the rainy day in August 2010, while awaiting an inbound run of the CPR 2816 through the bridges, about 6 miles or so from City Center on the CPR Laggan Sub. In the near background is the 85 St. road bridge and beyond is Stoney Trail, the future ring road around Calgary. Under Stoney Trail is Keith Yard, basically the overflow for the Alyth classification yard, used by the CPR for longer term storage. A bonus is that every train going through the twin bridges both ways must sound the horn, as the train comes around a curve westbound. A favorite rite of passage for teens was (and still is) to jump into the Bow River from the very top of the structures. Now the tracks are fenced off and CPR police patrols the area regularly, with a $200+ fine for trespassing. Freight trains run through there, either eastbound or westbound about every hour, carrying grain, sulphur, potash or containers on flatcars (double stack COFC) between Calgary and Vancouver. Most are a mile or more in length, with Distributed Power, usually 2 diesels in font, one in the middle and sometime one at the end. Laggan Sub is the original Canadian Pacific Railway mainline east and west, built in the late 1800s and upgraded several times over. The Empress 2816, Royal Canadian Pacific and Rocky Mountaineer pass through there regularly. A medium telephoto lens will capture individual bridges nicely from that viewpoint, if need be. |
| This picture was taken and submitted by Massey F. Jones | |
 | CNR bridge over the Bow River taken from the Ogden-Millican district |
| This series of pictures were taken and submitted by Larry Buchan , Calgary, Alberta Larry worked as a locomotive engineer on the CPR out of Calgary. |
 | CNR Bow River Bridge from underneath looking north |
| This picture was taken and submitted by Larry Buchan | |
 | CNR Bow River Bridge from underneath looking south |
| This picture was taken and submitted by Larry Buchan | |
 | CNR bridge over Bow River top view looking east |
| This picture was taken and submitted by Larry Buchan | |
 | CNR bridge over MacLeod Trail near Calgary Stampede Grounds |
| This picture was taken and submitted by Larry Buchan | |
 | CNR bridge over Ogden Road |
| This picture was taken and submitted by Larry Buchan | |
 | CNR bridge over Ogden Road taken from Bow River Bridge |
| This picture was taken and submitted by Larry Buchan | |
 | CNR steel bridge deck to replace wooden trestle over Deerfoot Trail |
| This picture was taken and submitted by Larry Buchan | |
 | CNR wooden trestle being replaced by steel bridge |
| This picture was taken and submitted by Larry Buchan | |
 | A good view of the CNR (GTP) high line that served as a transfer lead with the CPR interchange tracks to the right of the CPR control tower visible on the right. It also serviced the Gulf Oil Refinery, and at one time ran to the Grand Trunk Pacific Terminal on the west side of the Elbow River where Fort Calgary was located. |
| This picture was taken and submitted by Larry Buchan | |
 | CPR and CNR ex Grand Trunk Pacific bridges over Bow River a transfer from the CNR to the CPR interchange was taking place at this time, Calgary’s skyline has changed a lot since this slide was taken. |
| This picture was taken and submitted by Larry Buchan | |
.jpg) | Shown from a slightly different angle, a little more east of Larry Buchan’s 1971 photo above, is the CN high line to the right and CPR mainline (Brooks Sub at about Milepost 170 or so) to the left. The view looks northwest from 50 Ave SE near Ogden Road in the summer of 2012 and we note the Bonnybrook Bridge location. We can use the Calgary Tower to the extreme left as a reference point to compare the two photos. In Larry’s photo, the silver road bridge to the left has now been removed but we can observe how close Ogden Road comes to the CPR tracks and it remains so, for about a mile. (Those without their own transportation will want to use Calgary Transit Route 24). The strip in the centre of Massey’s picture is a part of a 28 km bicycle pathway passing under the CN Bridge and connecting with others in to the downtown core, while the Irrigation Canal in the foreground provides water from the Bow River to farmlands southwest of Calgary. A side view of the timber bridge over the canal is shown elsewhere on this page. |
| This picture was taken and submitted by Massey F. Jones | |
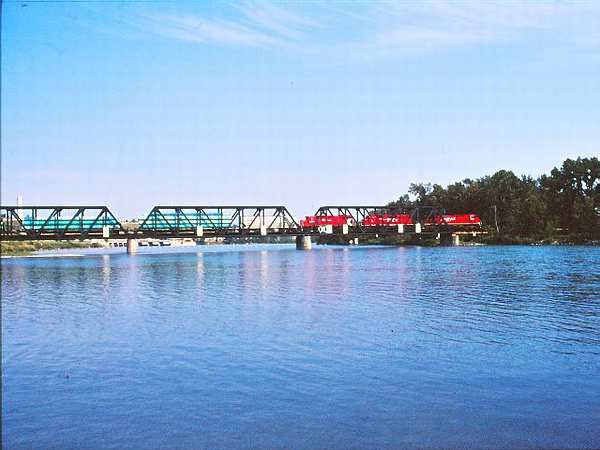
 | CPR Bonnybrook Bridge over Bow River there are three tracks visible P-1 the mainline, P-2 lead, and Old Ogden lead, not visible is a steel bridge attached in 1971 when the Alyth yard was rebuilt and it ran to the CPR’s Ogden Shops and other industrial leads. |
| This picture was taken and submitted by Larry Buchan | |
 | GP9u 1635, in December 1987, switching on the 1971 Bonnybrook Bridge, adjacent to its partner, the 1912 bridge which collapsed during the 2013 flood. Part of the old bridge is hidden by the trackside shack to the left. To the right is the CN interchange bridge, featured on this page, bringing cars from its nearby Sarcee Yard to the CP Alyth Yard. Also seen in a distance is the pulldown tower (which controls the hump yard) and the 12 Street Tower, which controls movements on the Red Deer, Macleod, Brooks and Laggan Subs; north, south, east and west out of Calgary. The large chimney about the middle is the Alyth Diesel Shop complex. Improvements to the yard in the late 80s or middle 90s removed the chimney and expanded the shop to accommodate larger diesels. This view looks just about straight north from a point around 50 Ave and Ogden Road in southeast Calgary. |
| This picture was taken and submitted by Massey F. Jones |
June 27th 2013, a portion of the 1912 CPR Bonnybrook Bridge southeast of downtown
Calgary collapsed with 6 tank cars on it
.jpg)
.jpg)
.jpg)
.jpg)
.jpg)
.jpg)
.jpg)
.jpg)

.jpg)

.jpg)
.jpg)

.jpg)
.jpg)

.jpg)


 | CNR underpass and trestle at Villeneuve Road. The bridge is northwest of St. Albert over Highway 633 on the CNR line that runs through St. Albert. Built around 1908. It is also believed that the highway overpass section of this structor was rebuilt in the early 1980’s. |
| This picture was submitted by Dale Redekopp St. Albert, AB | |
 | CNR underpass and trestle at Villeneuve Road. |
| This picture was submitted by Dale Redekopp St. Albert, AB | |
 | CNR underpass and trestle at Villeneuve Road. |
| This picture was submitted by Dale Redekopp St. Albert, AB | |
 | CNR underpass and trestle at Villeneuve Road. |
| This picture was submitted by Dale Redekopp St. Albert, AB | |
 | CNR underpass and trestle at Villeneuve Road. |
| This picture was submitted by Dale Redekopp St. Albert, AB | |
 | CNR underpass and trestle at Villeneuve Road. |
| This picture was submitted by Dale Redekopp St. Albert, AB | |
 | CNR underpass and trestle at Villeneuve Road. |
| This picture was submitted by Dale Redekopp St. Albert, AB | |
 | CNR underpass and trestle at Villeneuve Road. |
| This picture was submitted by Dale Redekopp St. Albert, AB | |
 | CPR wooden train trestle east of the town of Meeting Creek AB |
| This picture was submitted by Dale Redekopp St. Albert, AB |
 | CPR bridge over Elbow River taken from a yard locomotive in 1982 |
| This picture was taken and submitted by Larry Buchan | |
 | The Burbank Bridge, north of Red Deer near Blackfalds Alberta on September 2nd, 1984.. It was originally a wood trestle bridge built over the Blindman River north of Red Deer in 1910 by the Canadian Northern Western Railway (now the CNR). The middle was eventually replaced by a steel truss bridge with trestle ends. The length is around 620 feet and it is still being used by CN. Source: http://www.forthjunction.com/railway-bridges -alberta.htm The photo on their page doesn�t show the concrete piers but it contains descriptions and views of all the major Alberta bridges. |
| This picture was taken and submitted by Massey F. Jones | |
 | The Mintlaw Trestle is located a couple of miles southwest of Red Deer, Alberta. It was built about 1911 for the Alberta Central Railway and finished in 1912 by the Canadian Pacific Railway. It is 2112 feet long and 110 feet high. Last train in 1981. There is a group in Red Deer who are trying to raise money to convert it into a foot bridge to become part of a hiking trail. |
| This picture was submitted by Dale Redekopp St. Albert, AB | |
 | The Mintlaw Trestle |
| This picture was submitted by Dale Redekopp St. Albert, AB | |
 | The Mintlaw Trestle |
| This picture was submitted by Dale Redekopp St. Albert, AB | |
 | The Mintlaw Trestle |
| This picture was submitted by Dale Redekopp St. Albert, AB | |
 | This series of pictures were taken in October 1979 when Larry was training as an engineer on the Red Deer Subdivision north of Calgary, this was his only trip he took on the Alberta Central Railway Subdivision and views are of a spectacular railway bridge over the Red Deer River Approaching the bridge |
| This picture was taken and submitted by Larry Buchan | |
 | On the bridge, the speed I believe was 10 mph at that time |
| This picture was taken and submitted by Larry Buchan | |
 | View from middle of the bridge looking northward at the Red Deer River. |
| This picture was taken and submitted by Larry Buchan | |
 | View looking down towards river and water barrel stand visible ahead |
| This picture was taken and submitted by Larry Buchan | |
 | Another view from the bridge I understand it still survives and the community is trying to do something with it from what I’ve read |
| This picture was taken and submitted by Larry Buchan | |
 | A 1984 photo of the old East Coulee rail bridge, which served the (now totally restored) Atlas Coal Mine in the Alberta Badlands near Drumheller. http://www.atlascoalmine.ab.ca/ Built in 1948 likely by the CNR, the bridge is now still a prized local landmark and historical site but has fallen into disrepair and no one wants to pay for the restoration. Access: http://www.youtube.com/watch?v=iQg4gxCizHw to view the present condition inside the bridge. |
| This picture was taken and submitted by Massey F. Jones | |
 | Wooden railway bridge over Red Deer River looking towards yard at East Coulee, bridge tenders shanty visible on right side center 1976. |
| This picture was taken and submitted by Larry Buchan | |
 | Wooden railway bridge over Red Deer River looking towards yard at East Coulee, bridge tenders shanty visible on right side center 1976. |
| This picture was taken and submitted by Larry Buchan | |
 | Looking back at the box cars I was riding while crossing the bridge. These are old cars used for loading bulk coal, for the few customers left that were using domestic heating coal. |
| This picture was taken and submitted by Larry Buchan |
 | Wooden truss bridge over the Red Deer River in East Coulee, Alberta The picture was taken in 1976 it shows the turntable in the foreground, and the shanty on the approach to the bridge that controled vehicular traffic, and train movements over this dual purpose bridge. |
| This picture was taken and submitted by Larry Buchan | |
 | Winter scene of the wooden truss bridge over the Red Deer River in East Coulee, Alberta this is taken from near the tipple after I spotted the cars at the Atlas Coal Mining Co. the last of hundreds of mines that were in the Drumheller Valley March 1974. |
| This picture was taken and submitted by Larry Buchan | |
 | Mile 51.7 Laggan Subdivision railway bridge at Seebe over Bow River location of the old Calgary Power Electric dam site looking east |
| This picture was taken and submitted by Larry Buchan | |
 | Mile 51.7 Laggan Subdivision railway bridge at Seebe over Bow River looking northeast |
| This picture was taken and submitted by Larry Buchan | |
 | Mile 51.7 Laggan Subdivision railway bridge at Seebe over Bow River west span looking south |
| This picture was taken and submitted by Larry Buchan | |
 | Mile 51.7 Laggan Subdivision railway bridge at Seebe over Bow River west span looking north |
| This picture was taken and submitted by Larry Buchan | |
 | Mile 51.7 Laggan Subdivision railway bridge at Seebe over Bow River east span |
| This picture was taken and submitted by Larry Buchan | |
 | Mile 57 Laggan Subdivision railway bridge crossing over Exshaw Creek looking north at Heart Mountain |
| This picture was taken and submitted by Larry Buchan | |
 | Mile 57 Laggan Subdivision railway bridge looking eastward older bridge structure on left newer bridge deck on the right mileage indicators on bridge abutments. |
| This picture was taken and submitted by Larry Buchan | |
 | Mile 53.1 Laggan Subdivision Kananaskis railway bridge over Bow River looking northwest. |
| This picture was taken and submitted by Larry Buchan |
 | Mile 53.1 Laggan Subdivision Kananaskis railway bridge over Bow River looking northeast. |
| This picture was taken and submitted by Larry Buchan | |
 | Mile 25.7 Laggan subdivision railway bridge over Bow River at Cochrane looking west. |
| This picture was taken and submitted by Larry Buchan | |
 | Mile 25.7 Laggan subdivision railway bridge over Bow River at Cochrane looking west. |
| This picture was taken and submitted by Larry Buchan | |
 | Mile 25.7 Laggan subdivision railway bridge over Bow River at Cochrane looking southwest |
| This picture was taken and submitted by Larry Buchan | |
 | Mile 25.7 Laggan Subdivision railway bridge over Bow River at Cochrane looking North-west. |
| This picture was taken and submitted by Larry Buchan | |
 | Mile 25.7 Laggan Subdivision railway bridge over Bow River at Cochrane with eastbound approaching. |
| This picture was taken and submitted by Larry Buchan | |
 | This bridge is located bridge found between Johnston Creek Camp site, Banff and the Bow River |
| This picture was taken and submitted by Ron Hahn | |
 | This bridge is located bridge between Johnston Creek Camp site, Banff and the Bow River |
| This picture was submitted by Larry Buchan | |
 | These twin bridges used to be on the outskirts of Northwest Calgary near the district of Bowness, unfortunately a lot of kids used to use it in the summer to dive off of into the river, and there were many tragic accidents as there was a curvature on the approach in both directions, and trains would be operating at speeds of 45 miles an hour so the outcome would be unavoidable, in the 90s the city of Calgary even went to the trouble of building a pedestrian bridge nearby that the kids could use, but there are still too many thrill seekers loving the element of danger, and playing chicken with trains. |
| This picture was submitted by Larry Buchan | |
 | Here are some photos of the East span looking West towards Keith from the South side we see an eastbound on the bridge. |
| This picture was submitted by Larry Buchan | |
 | |
| This picture was submitted by Larry Buchan | |
 | These pictures show the East span looking westward, the photo of the mile board for Keith has been painted over and reads “ith” along with a under deck view, and the center abutment. |
| This picture was submitted by Larry Buchan | |
 | |
| This picture was submitted by Larry Buchan |
 | |
| This picture was submitted by Larry Buchan | |
 | West span of twin bridges looking East |
| This picture was submitted by Larry Buchan | |
 | Here are some photos of the West span of the twin bridges view one looking East, one showing a mileboard Brickburn siding, two views looking to the North, and some other views looking southward. |
| This picture was submitted by Larry Buchan | |
 | West span looking northward |
| This picture was submitted by Larry Buchan | |
 | West span looking northward |
| This picture was submitted by Larry Buchan | |
 | |
| This picture was taken and submitted by Larry Buchan | |
| The following series of pictures were taken and submitted by Larry Buchan. They show the bridge crossing the Bow River going North to the Red Deer Subdivision from Bengal the control point where the 12 Street Tower interlocking operator directs traffic for incoming and outgoing trains. | |
 | Track schematic of Bengal and bridge over the Bow River |
| This picture was taken and submitted by Larry Buchan | |
 | Bengal station board. |
| This picture was taken and submitted by Larry Buchan | |
 | Interlocking signals on south bank of Bow River At one time there were four tracks here |
| This picture was taken and submitted by Larry Buchan | |
 | Views of Bow River bridge looking northward |
| This picture was taken and submitted by Larry Buchan | |
 | Views of Bow River bridge looking northward |
| This picture was taken and submitted by Larry Buchan | |
 | Views of Bow River bridge looking northward |
| This picture was taken and submitted by Larry Buchan | |
 | Looking Northwest |
| This picture was taken and submitted by Larry Buchan |
 | Looking Northwest |
| This picture was taken and submitted by Larry Buchan | |
 | Looking Northeast |
| This picture was taken and submitted by Larry Buchan | |
 | Looking Northeast. |
| This picture was taken and submitted by Larry Buchan | |
 | Bridge over Bow River from the north bank |
| This picture was taken and submitted by Larry Buchan | |
 | Bridge over Bow River looking Southwest |
| This picture was taken and submitted by Larry Buchan | |
 | In this view taken during the spring in the mid-80s, CP 8106 has just crossed the north side of the Bow River Bridge east of the Calgary downtown core, most likely originating from Alyth Yard with a load of newsprint. Near Bengal (Mile 1.1 Laggan Sub), it will switch east to the Meridian Yard lead and pass through a round culvert-type tunnel under Deerfoot Trail (see Larry Buchan�s pictureshown below and climb a very steep grade to deliver its load at The Calgary Herald building, up the hill. The locomotive is an SW1200RS, built by General Motors in June 1958 (ser# A1486). It was removed from service in August 1999 and sold to Louis Dreyfus Corp in the US. The RS designation means that it�s also fit for road service, by being coupled to other locomotives as extra power on the mainline. |
| This picture was taken and submitted by Massey F. Jones | |
 | Meridian Yard lead that runs through tunnel under Deerfoot Trail to service industries including the Calgary Herald, with grades of over 2.2% the steepest in the terminal, and classed as Mountain Grade. |
 | CPR track profile showing Cochrane and bridge at Mile 26.8 , and Mitford 2 storage tracks for sulfur & LPG tank empties the Copithorne spur starts just East of the track signal. |
| This picture was taken and submitted by Larry Buchan | |
 | At mile 27.2 Of the Laggan Subdivision is the Copithorne Spur that runs 8.94 miles, it services the Shell Oil Gas plant at Jumping Pound approaching the plant at mile 8.01 is this wooden trestle, I took the photo in 1980, it has since been filled in with dirt and gravel. This spur had lots of grades over 2% the steepest East of the Continental divide in Alberta. We would gather up our loads of sulfur and LPG tanks, we were limited to 5 cars a unit, usually having a 2 units, later on in the 90s we had 3 units so we can handle 15 cars. We would take off down hill from the plant over this rickety wooden trestle and a speed as high as we could to get a swing at the hill on the other side, if everything worked out okay in the units it was snow trouble we would have a successful trip, otherwise we would leave half of our train, and take the rest over to a doubling spur, and go back for the second portion. |
| This picture was taken and submitted by Larry Buchan | |
 | CNR Rochfort Trestle near Mayerthorpe, Alberta (Google maps 53.903049,-115.020289) This is the longest wood trestle in North America CNR 2,414 ft. (736 metres) long, 110 ft. tall It was built in 1914 over Paddle River. There were two short portions replaced by steel This tressel is still in use by CN |
| This picture was taken and submitted by Ronald Hahn | |
 | CNR Rochfort Trestle near Mayerthorpe, Alberta (Google maps 53.903049,-115.020289) |
| This picture was taken and submitted by Ronald Hahn | |
| Larry put together a series of pictures of a a small railway bridge located just north of the one he sent last time that crosses the Bow River on the Red Deer Subdivision. This Location Is called “Titian” and crosses Nose Hill Creek | |
 | The Pecten Sub trestle crosses over Highway 6, between Waterton Lakes National Park and Pincher Creek, AB. The bridge was built in the 1960s when a spur was built off the CP Crowsnest mainline at Brocket, AB for a new Shell Gas complex, about 5-10 kilometers west of the bridge. It’s built with wood on each side, and a steel deck overtop the highway, with steel reinforcing the wood. The Shell is still in use today and the bridge carries CP’s heaviest diesels on a regular basis, a few times every week. |
| This picture was taken and submitted by Braedan Dunne, May 21, 2013 | |
 | The Pecten Sub trestle |
| This picture was taken and submitted by Braedan Dunne | |
 | St. Albert was built for the CNR in 1906 and is still in use as of Jan 2015 |
| his picture was taken and submitted by Dale Redekopp, St. Albert, AB | |
 | Double bridge crossing Nose Hill Creek, original span in foreground, and second bridge deck added in the early 2000’s this view is looking eastward towards Deerfoot Trail. |
| This picture was taken and submitted by Larry Buchan | |
 | CPR track profile from 197 showing Titian storage siding and bridge over Nose Creek, I have some more pictures of the wooden trestle further north on the Red Deer Subdivision about mileage 50, and some other wooden trestles over the CPR Western Irrigation District South of Alyth yard. |
| This picture was taken and submitted by Larry Buchan | |
 | A wooden trestle over Nose Creek on the Red Deer Subdivision Petro at mile 11.7 is where the Rockyview Spur leaves the Red Deer Sub going eastward 4.06 miles to service the Canadian Oxy Petroleum sulfur plant, and Turbo refinery in its day about a quarter of a mile from the junction is this wooden trestle over Nose Creek. While all the plants are shut down now the Turbo refinery was bought by Petro Canada and dismantled and shipped to the Far East, the Spurs still remains sitting dormant, but there our plans afoot for the possibility of it servicing a new Target warehouse facility in the future. |
| This picture was taken and submitted by Larry Buchan | |
 | CPR track profile showing Petro at mile 11.7 Red Deer Sub about 3 miles north of the old Beddington Siding |
| This picture was taken and submitted by Larry Buchan | |
 | Wooden Trestle bridge deck looking East |
| This picture was taken and submitted by Larry Buchan | |
 | View looking Southeast |
| This picture was taken and submitted by Larry Buchan | |
 | View showing Nose Creek meandering southward |
| This picture was taken and submitted by Larry Buchan | |
 | View showing Nose Creek meandering southward. |
| This picture was taken and submitted by Larry Buchan | |
 | View looking Northeast |
| This picture was taken and submitted by Larry Buchan | |
 | Research seems to indicate that this is the Briggs Trestle, a rare timber bridge and one of the last ones in the region. It is located northwest of Red Deer and spans a ravine near the Blindman River near the vanished village of Briggs, just southwest of Blackfalds AB. Estimated to be 570 to 590 feet long (about 200 metres) and it was constructed in 1910 by the Canada Northwestern Railway, now CN and is still in use a century later to move material and equipment to and from oil and gas customers on the Brazeau Sub. Google Earth roughly situates it at 52º.20�.17�N and 113º.54�.12�W. The nearest coordinates in direct line, are very roughly about 2.5 miles (4km) west of the Queen Elizabeth II Highway (Alberta Highway 2) and 1.7 mile (2.74 km) exactly due north of 11A Highway. Unfortunately, the trestle is not close to any public viewing point. D. Grant Watson has property that is as close as one can get to this bridge and he has made off to any rail fan that wanted to photograph this trestle to make an appointment with him to do so via email at: nospam-grantwatson@nospam-hotmail.com Please remove the two nospam- from this address to use it. |
| Photo: Lorne Unwin – Massey F. Jones collection | |
 | The CN Brazeau Sub. Briggs is at Mile 38.0 between Alix Jct and Brazeau. A footnote in the Time Table indicates that movements must not be operated beyond mileage 96.0, except by special authorization. |
| Submitted by Massey F. Jones | |
 | Close-up of the LRT station end of the footbridge. connecting the Calgary Transit SUNALTA to the main Greyhound bus depot, at the western end of downtown Calgary. Several photo angles will become possible. |
| This picture was taken and submitted by Massey F. Jones | |
 | The LRT guideway into Calgary Transit SUNALTA LRT station connecting to downtown. View an animation of the West LRT line at: http://www.westlrt.ca/contentabout/route_animation.cfm Notice the Calgary Tower in the background. The site is fully accessible from 9 Avenue SW. |
| This picture was taken and submitted by Massey F. Jones | |
 | The LRT consists has just come out of SUNALTA LRT station and now passes the CPR mainline, with the green signal indicating that a westbound consist is about to proceed under. The arched bridge in the background beyond the signals, is a pedestrian bridge linking the Calgary Transit SUNALTA LRT to the Greyhound bus depot. Standing on the bridge makes it possible to get an overhead view of the track with the Calgary Tower in the background. A very small part of the LRT station can be seen left centre, just under the bridge. See the view that can taken from it elsewhere on this page. This slight telephoto view, taken from the corner of 11 St SW and 9 Ave at the edge of the downtown core (Mi. 1.1 Laggan Sub), looks west on May 20, 2014. Morning is the best time to photograph this overpass in full sun. Prior to 9:00 am, will see traffic about every 5 minutes on the LRT bridge and it is about the time when eastbound CP freights also arrive in Calgary. |
| This picture was taken and submitted by Massey F. Jones | |
| The brand new pedestrian overpass at Calgary Transit’s SUNALTA LRT station offers a fairly spectacular view of CPR Laggan Sub below (about Milepost 1.2), by just stepping outside the LRT station door and taking a dozen steps. This view looks east towards downtown. The Greyhound station is at the other end of the pedestrian overpass. Looking west is more plain, with a long stretch of track ending by a curve to the right. . | |
| This picture was taken and submitted by Massey F. Jones | |
 | Frequent westbound CPR consists pass under the Calgary Transit overpass at SUNALTA, just west of downtown and the pedestrian bridge from which this view was taken, mere steps from the station front door. Two more mile-long CP consists followed in rapid succession within 30-minutes of this view around 5:00 pm May 23rd, 2014. In the background, the Calgary Tower and CP Corporate HQ on 9th Avenue SW, with CPR locomotive #29 on display in front of their building. (See the CPR page: http://yourrailwaypictures.com/CPRsteamengines/). If you have some time to spare between Greyhound buses, the overpass links the bus terminal with the LRT station. |
| This picture was taken and submitted by Massey F. Jones | |
| CPR 9807 West passes under the newly-opened SUNALTA LRT station just west of downtown, just after dark; on January 2nd, 2013. In the background, the Calgary Tower and CP Corporate HQ on 9th Avenue SW, with CPR locomotive #29 on display in front of their building. (See the CPR page: http://yourrailwaypictures.com/CPRsteamengines/). If you have some time to spare between Greyhound buses, the overpass links the bus terminal with the LRT station. | |
| This picture was taken and submitted by Massey F. Jones |